1)
http://pinrojas.com/2014/07/29/theres-real-magic-behind-openstack-neutron/
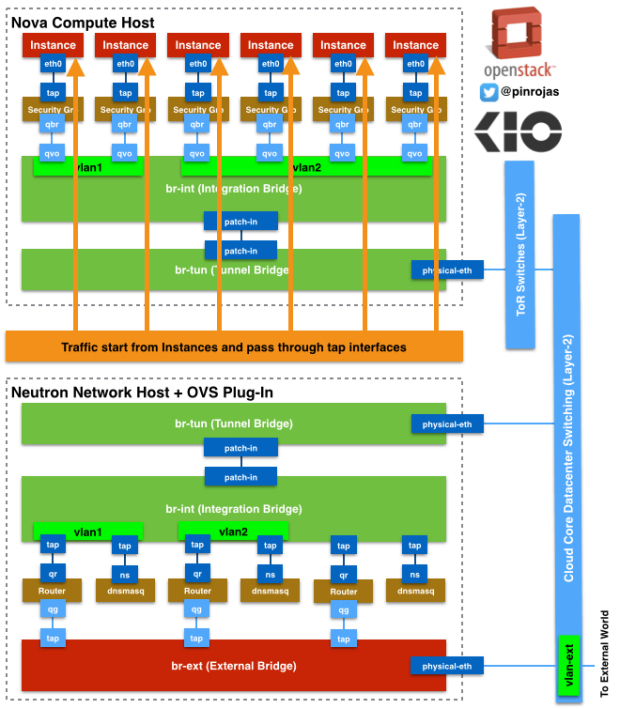
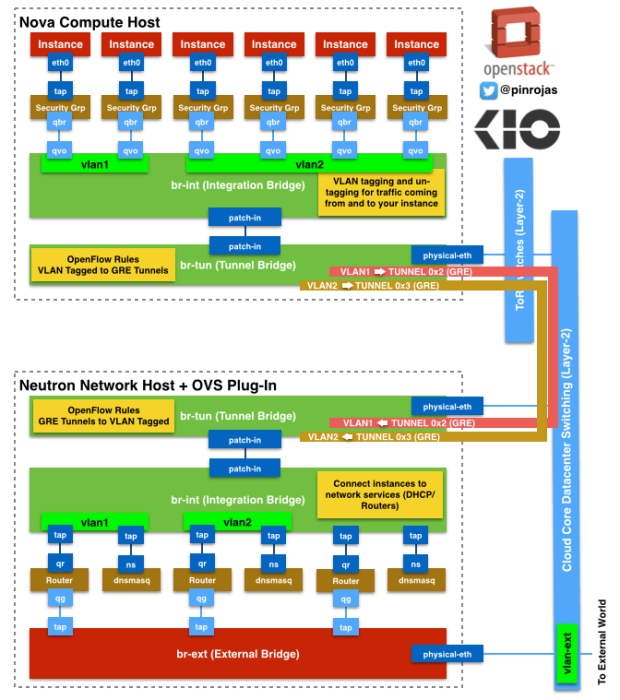
Routers and dnsmasq are independent namespaces with their own Linux Network Stack. Namespaces helps to manage traffic with overlapping private IPs between different routers associated to different tenants or projects. Routers helps to route traffic between tenant’s subnets and also to/from the external World. Also routers are using Linux iptables to filter traffic and also to make floating IP works through NAT (Network Address Translation) to chosen instances. dnsmasq is also working on a Linux Network Stack with DHCP and DNS processes serving exclusively to the associated tenant.
2)
https://developer.rackspace.com/blog/neutron-networking-l3-agent/
Neutron has an API extension to allow administrators and tenants to create "routers" that connect to L2 networks. Known as the "neutron-l3-agent", it uses the Linux IP stack and iptables to perform L3 forwarding and NAT. In order to support multiple routers with potentially overlapping IP addresses, neutron-l3-agent defaults to using Linux network namespaces to provide isolated forwarding contexts. Like the DHCP namespaces that exist for every network defined in Neutron, each router will have its own namespace with a name based on its UUID.
3)
http://docs.openstack.org/developer/neutron/devref/layer3.html
The neutron-l3-agent uses the Linux IP stack and iptables to perform L3 forwarding and NAT. In order to support multiple routers with potentially overlapping IP addresses, neutron-l3-agent defaults to using Linux network namespaces to provide isolated forwarding contexts. As a result, the IP addresses of routers will not be visible simply by running “ip addr list” or “ifconfig” on the node. Similarly, you will not be able to directly ping fixed IPs.
To do either of these things, you must run the command within a particular router’s network namespace. The namespace will have the name “qrouter-.
http://pinrojas.com/2014/07/29/theres-real-magic-behind-openstack-neutron/
Routers and dnsmasq are independent namespaces with their own Linux Network Stack. Namespaces helps to manage traffic with overlapping private IPs between different routers associated to different tenants or projects. Routers helps to route traffic between tenant’s subnets and also to/from the external World. Also routers are using Linux iptables to filter traffic and also to make floating IP works through NAT (Network Address Translation) to chosen instances. dnsmasq is also working on a Linux Network Stack with DHCP and DNS processes serving exclusively to the associated tenant.
2)
https://developer.rackspace.com/blog/neutron-networking-l3-agent/
Neutron has an API extension to allow administrators and tenants to create "routers" that connect to L2 networks. Known as the "neutron-l3-agent", it uses the Linux IP stack and iptables to perform L3 forwarding and NAT. In order to support multiple routers with potentially overlapping IP addresses, neutron-l3-agent defaults to using Linux network namespaces to provide isolated forwarding contexts. Like the DHCP namespaces that exist for every network defined in Neutron, each router will have its own namespace with a name based on its UUID.
3)
http://docs.openstack.org/developer/neutron/devref/layer3.html
The neutron-l3-agent uses the Linux IP stack and iptables to perform L3 forwarding and NAT. In order to support multiple routers with potentially overlapping IP addresses, neutron-l3-agent defaults to using Linux network namespaces to provide isolated forwarding contexts. As a result, the IP addresses of routers will not be visible simply by running “ip addr list” or “ifconfig” on the node. Similarly, you will not be able to directly ping fixed IPs.
To do either of these things, you must run the command within a particular router’s network namespace. The namespace will have the name “qrouter-


