
3)
Chapter 3. Configure the Identity Service
==============================
http://docs.openstack.org/icehouse/config-reference/content/keystone-configuration-file.html
a)
Identity service configuration file
http://docs.openstack.org/icehouse/config-reference/content/keystone-configuration-file.html <== IMP
b)
Identity service sample configuration files
http://docs.openstack.org/icehouse/config-reference/content/sample-configuration-files.html <== IMP
A)
Identity Service concepts
----------------------------------
http://docs.openstack.org/icehouse/install-guide/install/apt/content/keystone-concepts.html

Original image: http://docs.openstack.org/icehouse/install-guide/install/apt/content/figures/2/figures/SCH_5002_V00_NUAC-Keystone.png
*1)Alice sent login request with credentials to keystone and keystone sent token and catalog back to Alice after authentication.
*2)Alice send an another list tenant request to keystone with token and keystone sent list of tenants back to Alice.
*3)Alice sent new login request with credentials and tenant to keystone and keystone sent token and list of available services back to Alice after authentication.Alice took nova service from service list and find endpoint of nova service and sent create instance request with token to that service endpoint.
*4)Nova Service sent token again to keystone and check, is the token correct? and and does that token has allowed to use nova service?.
*5)Keystone send following response to Nova service. a)Alice's tenant is authorized to access nova service. b)That token is belongs to user Alice and its valid.
*6)Nova servide execute the create instance request and create new VM.
*7)Nova Service sent status (Instance has been created) of request to Alice.
B)
Install the Identity Service (Keystone)
--------------------------------------------------
http://docs.openstack.org/icehouse/install-guide/install/apt/content/keystone-install.html
b1, a)
Install the OpenStack Identity Service on the controller node, together with python-keystoneclient (which is a dependency):
#sudo apt-get install keystone


b1, b)
The Identity Service uses a database to store information. Specify the location of the database in the configuration file. In this guide, we use a MySQL database on the controller node with the username keystone. Replace KEYSTONE_DBPASS with a suitable password for the database user.
Edit /etc/keystone/keystone.conf and change the [database] section:
[database]
connection = mysql://keystone:KEYSTONE_DBPASS@controller/keystone


b1, c)
By default, the Ubuntu packages create a SQLite database. Delete the keystone.db file created in the /var/lib/keystone/ directory so that it does not get used by mistake:
#rm /var/lib/keystone/keystone.db


b1, d)
Use the password that you set previously to log in as root. Create a keystone database user:
$ mysql -u root -p
mysql> CREATE DATABASE keystone;
mysql> GRANT ALL PRIVILEGES ON keystone.* TO 'keystone'@'localhost' \
IDENTIFIED BY 'KEYSTONE_DBPASS';
mysql> GRANT ALL PRIVILEGES ON keystone.* TO 'keystone'@'%' \
IDENTIFIED BY 'KEYSTONE_DBPASS';
mysql> exit


* MySQL root user password is opsuser
* MySQL keystone user password is opspass


b1, e)
Create the database tables for the Identity Service:
# su -s /bin/sh -c "keystone-manage db_sync" keystone
* Above command didn't work for me
* Worked command
#sudo keystone-manage db_sync


b1, f)
Define an authorization token to use as a shared secret between the Identity Service and other OpenStack services.
Edit /etc/keystone/keystone.conf and change the [DEFAULT] section.
[DEFAULT]
admin_token = tokentoken


b1, g)
Configure the log directory.
Edit the /etc/keystone/keystone.conf file and update the [DEFAULT] section.
[DEFAULT]
log_dir = /var/log/keystone


b1, h)
Restart the Identity Service.
# service keystone restart


b1, i)
Check whether keystone service is running or not.


b1, j)
* Remove your http and https proxy if you are using it in controller node (Optional)
#export http_proxy = ""
#export https_proxy = ""
* Otherwise, you will get ERRO 503: Service Unavailable.
* You will get error, failed: Connection refused, if keystone service is not running and reachable, Check #sudo service keystone status.


C)
Define users, tenants, and roles
-------------------------------------------
http://docs.openstack.org/trunk/install-guide/install/apt/content/keystone-users.html
c1, a)
Create the admin user:
#keystone --os-token tokentoken --os-endpoint http://controller:35357/v2.0 --debug user-create --name=admin --pass=adminpass --email=admin@admin.com


c1, b)
Create the admin role:
#keystone --os-token tokentoken --os-endpoint http://controller:35357/v2.0 --debug role-create --name=admin


c1, c)
Create the admin tenant:
#keystone --os-token tokentoken --os-endpoint http://controller:35357/v2.0 --debug tenant-create --name=admin --description="Admin Tenant"


c1, d)
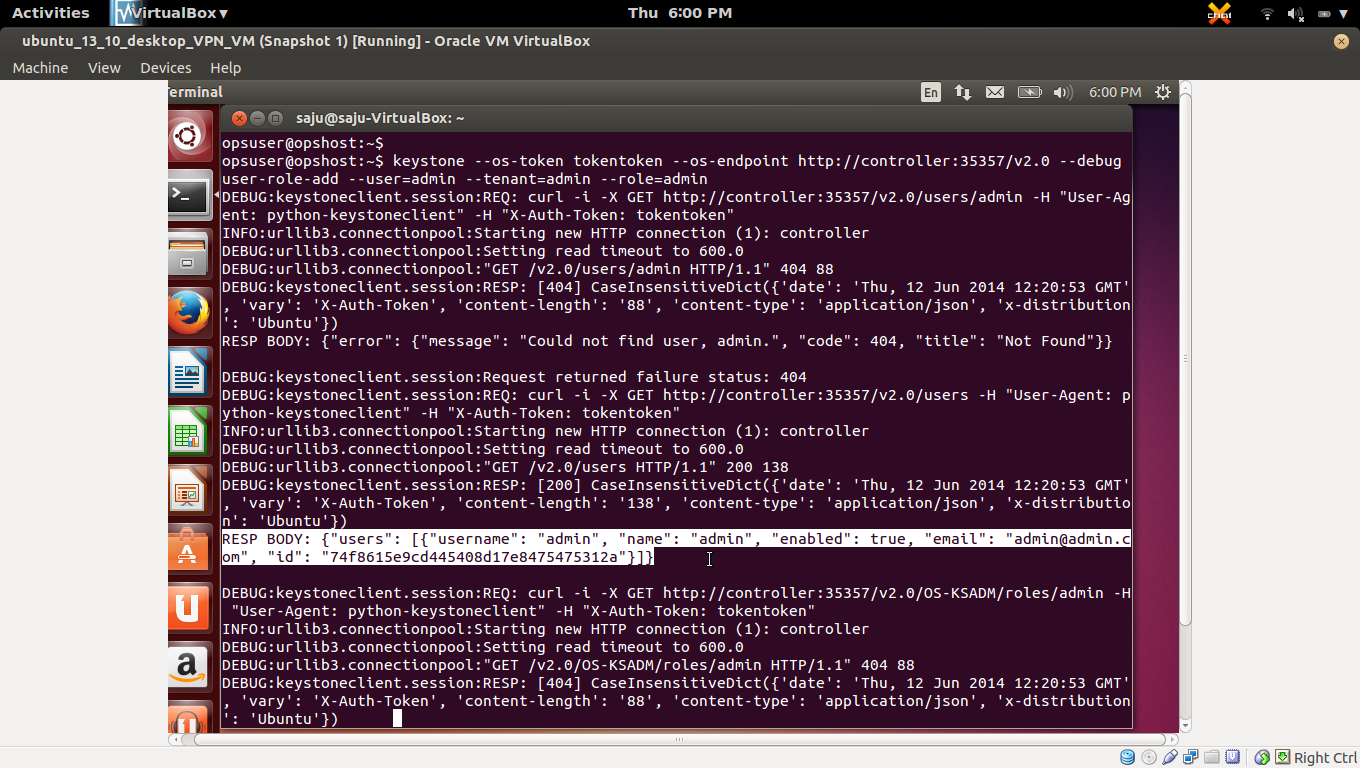
You must now link the admin user, admin role, and admin tenant together using the user-role-add option:
#keystone --os-token tokentoken --os-endpoint http://controller:35357/v2.0 --debug user-role-add --user=admin --tenant=admin --role=admin


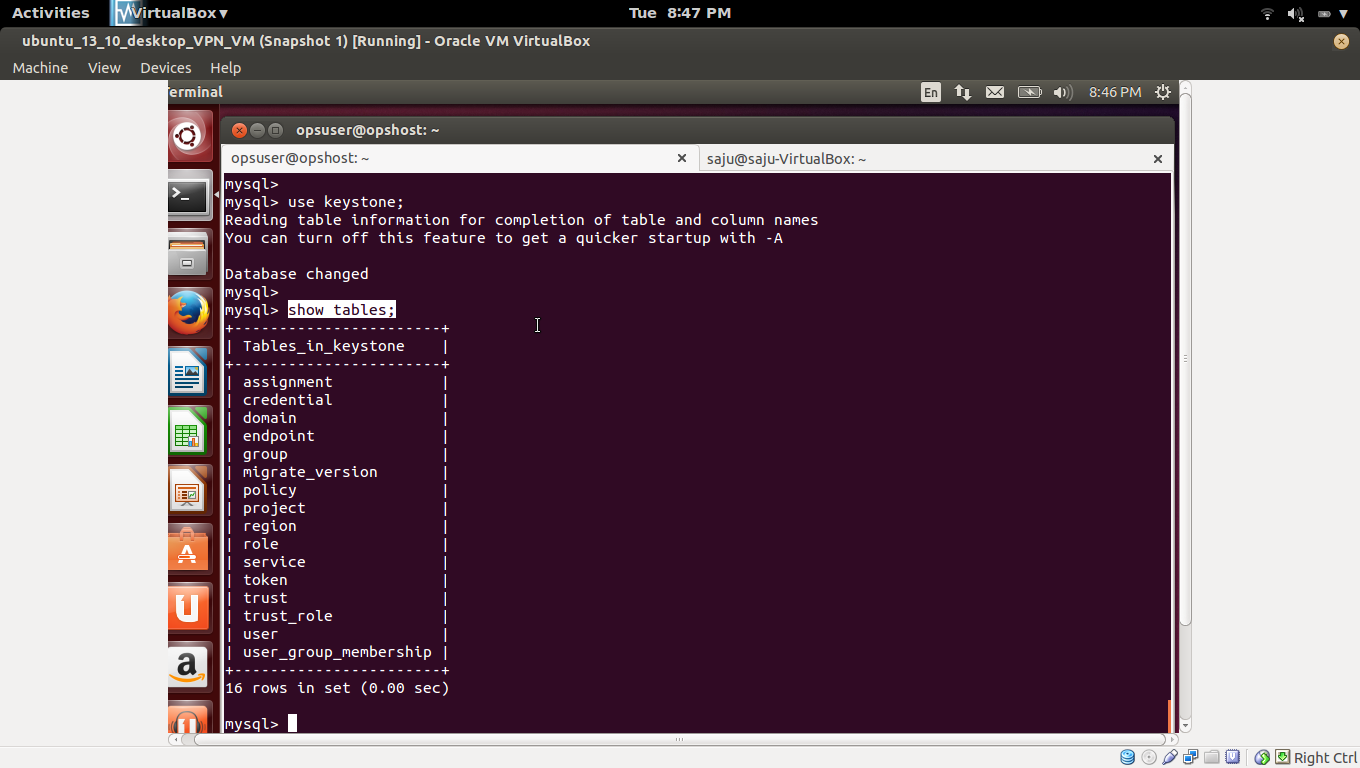
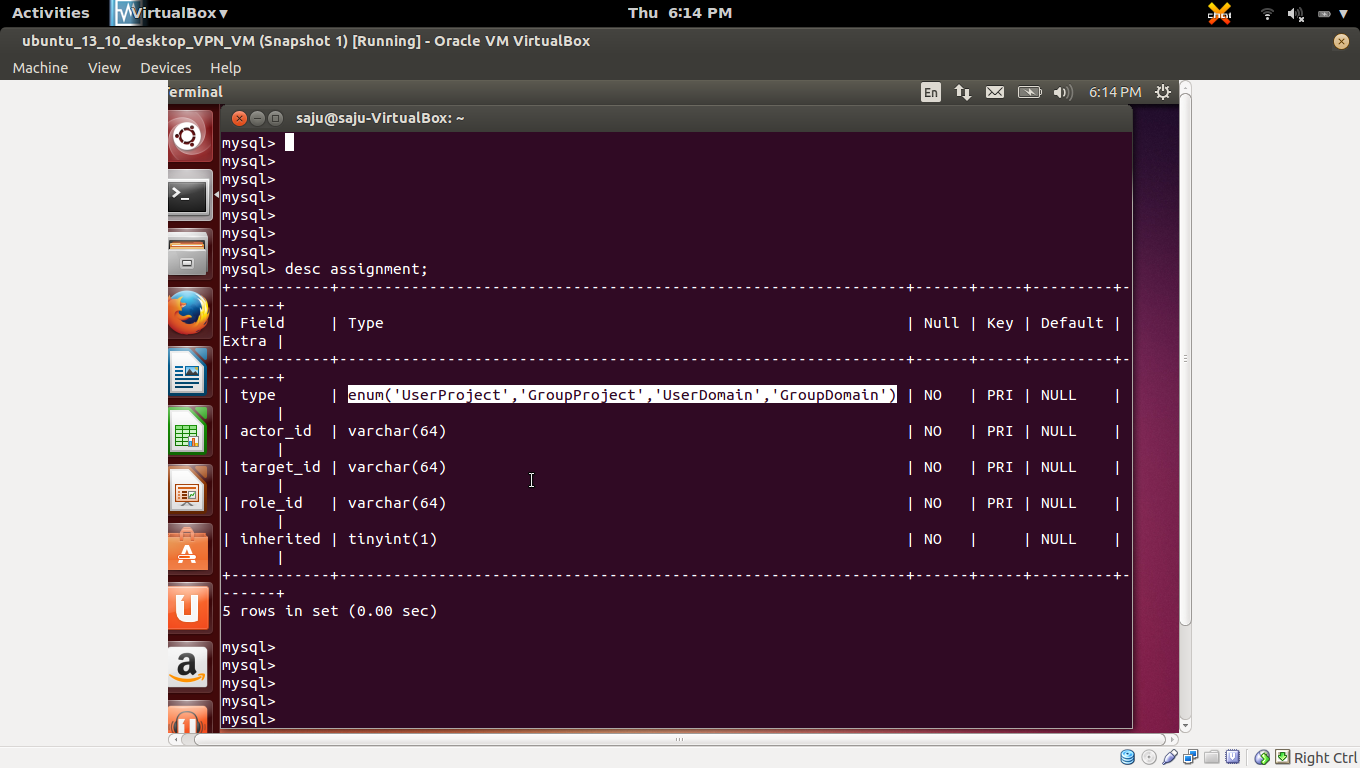
* User, Project and Role relation save in "assignment" table of keystone db.
* "assignment" table has a column named "type", and its type is "enum".


c1, e)
Link the admin user, _member_ role, and admin tenant:
#keystone --os-token tokentoken --os-endpoint http://controller:35357/v2.0 --debug user-role-add --user=admin --role=_member_ --tenant=admin


C2
Create a normal user
---------------------------
Follow these steps to create a normal user and tenant, and link them to the special _member_ role. You will use this account for daily non-administrative interaction with the OpenStack cloud. You can also repeat this procedure to create additional cloud users with different usernames and passwords.
c2, a)
Create the demo user:
#keystone --os-token tokentoken --os-endpoint http://controller:35357/v2.0 --debug user-create --name=demo --pass=demopass --email=demo@demo.com
c2, b)
Create the demo tenant:
#keystone --os-token tokentoken --os-endpoint http://controller:35357/v2.0 --debug tenant-create --name=demo --description="Demo Tenant"
c2, c)
Link the demo user, _member_ role, and demo tenant:
#keystone --os-token tokentoken --os-endpoint http://controller:35357/v2.0 --debug user-role-add --user=demo --role=_member_ --tenant=demo
C3)
Create a service tenant
-------------------------------
OpenStack services also require a username, tenant, and role to access other OpenStack services. In a basic installation, OpenStack services typically share a single tenant named service.
You will create additional usernames and roles under this tenant as you install and configure each service.
* For each service like nova, glance, etc--- , we need to create new username and role under "service" tenant.
C3, a)
Create the service tenant:
#keystone --os-token tokentoken --os-endpoint http://controller:35357/v2.0 --debug tenant-create --name=service --description="Service Tenant"


C4)
Define services and API endpoints
---------------------------------------------
http://docs.openstack.org/icehouse/install-guide/install/apt/content/keystone-services.html
So that the Identity Service can track which OpenStack services are installed and where they are located (endpoint) on the network, you must register each service in your OpenStack installation. To register a service, run these commands:
**keystone service-create: Describes the service.
**keystone endpoint-create: Associates API endpoints with the service.
You must also register the Identity Service itself.
c4, a)
Create a service entry for the Identity Service:
#keystone --os-token tokentoken --os-endpoint http://controller:35357/v2.0 --debug service-create --name=keystone --type=identity --description="OpenStack Identity"


c4, b)
Create a endpoint entry for the Identity Service:
Specify an API endpoint for the Identity Service by using the returned service ID. When you specify an endpoint, you provide URLs for the public API, internal API, and admin API. In this guide, the controller host name is used. Note that the Identity Service uses a different port for the admin API.
#keystone --os-token tokentoken --os-endpoint http://controller:35357/v2.0 --debug endpoint-create \
--service-id=$(keystone service-list | awk '/ identity / {print $2}') \
--publicurl=http://controller:5000/v2.0 \
--internalurl=http://controller:5000/v2.0 \
--adminurl=http://controller:35357/v2.0


C5)
Verify the Identity Service installation
--------------------------------------------------
http://docs.openstack.org/icehouse/install-guide/install/apt/content/keystone-verify.html
c5, a)
You can now use regular user name-based authentication.
Request a authentication token by using the admin username and the password you chose for that user (not giving tenant_name).
#keystone --os-username admin --os-password admin --os-auth-url http://controller:35357/v2.0 --debug token-get
In response, you receive a token paired with your user ID. This verifies that the Identity Service is running on the expected endpoint and that your user account is established with the expected credentials.
c5, b)
Verify that authorization behaves as expected. To do so, request authorization on a tenant.
Request a authentication token by using the admin username, password and tenant_name.
##Get token
#keystone --os-username admin --os-password admin --os-tenant-name admin --os-auth-url http://controller:35357/v2.0 --debug token-get
##Make "user-list" request with new token
#keystone --os-token your_token --os-endpoint http://controller:35357/v2.0 --debug user-list
In response, you receive a token that includes the ID of the tenant that you specified. This verifies that your user account has an explicitly defined role on the specified tenant and the tenant exists as expected.
* Goto /etc/keystone/keystone.conf and set token_format=UUID to change the format of the token from PKI to UUID, So you can easily copy paste token.


c5, c)
You can also set your --os-* variables in your environment to simplify command-line usage. Set up a admin-openrc.sh file with the admin credentials and admin endpoint:
export OS_USERNAME=admin
export OS_PASSWORD=adminpass
export OS_TENANT_NAME=admin
export OS_AUTH_URL=http://controller:35357/v2.0
* Source this file to read in the environment variables:
$ source admin-openrc.sh
* Verify that your admin-openrc.sh file is configured correctly. Run the same command without the --os-* arguments:
$ keystone token-get


Chapter 3. Configure the Identity Service
==============================
http://docs.openstack.org/icehouse/config-reference/content/keystone-configuration-file.html
a)
Identity service configuration file
http://docs.openstack.org/icehouse/config-reference/content/keystone-configuration-file.html <== IMP
b)
Identity service sample configuration files
http://docs.openstack.org/icehouse/config-reference/content/sample-configuration-files.html <== IMP
A)
Identity Service concepts
----------------------------------
http://docs.openstack.org/icehouse/install-guide/install/apt/content/keystone-concepts.html
Original image: http://docs.openstack.org/icehouse/install-guide/install/apt/content/figures/2/figures/SCH_5002_V00_NUAC-Keystone.png
*1)Alice sent login request with credentials to keystone and keystone sent token and catalog back to Alice after authentication.
*2)Alice send an another list tenant request to keystone with token and keystone sent list of tenants back to Alice.
*3)Alice sent new login request with credentials and tenant to keystone and keystone sent token and list of available services back to Alice after authentication.Alice took nova service from service list and find endpoint of nova service and sent create instance request with token to that service endpoint.
*4)Nova Service sent token again to keystone and check, is the token correct? and and does that token has allowed to use nova service?.
*5)Keystone send following response to Nova service. a)Alice's tenant is authorized to access nova service. b)That token is belongs to user Alice and its valid.
*6)Nova servide execute the create instance request and create new VM.
*7)Nova Service sent status (Instance has been created) of request to Alice.
B)
Install the Identity Service (Keystone)
--------------------------------------------------
http://docs.openstack.org/icehouse/install-guide/install/apt/content/keystone-install.html
b1, a)
Install the OpenStack Identity Service on the controller node, together with python-keystoneclient (which is a dependency):
#sudo apt-get install keystone
b1, b)
The Identity Service uses a database to store information. Specify the location of the database in the configuration file. In this guide, we use a MySQL database on the controller node with the username keystone. Replace KEYSTONE_DBPASS with a suitable password for the database user.
Edit /etc/keystone/keystone.conf and change the [database] section:
[database]
connection = mysql://keystone:KEYSTONE_DBPASS@controller/keystone
b1, c)
By default, the Ubuntu packages create a SQLite database. Delete the keystone.db file created in the /var/lib/keystone/ directory so that it does not get used by mistake:
#rm /var/lib/keystone/keystone.db
b1, d)
Use the password that you set previously to log in as root. Create a keystone database user:
$ mysql -u root -p
mysql> CREATE DATABASE keystone;
mysql> GRANT ALL PRIVILEGES ON keystone.* TO 'keystone'@'localhost' \
IDENTIFIED BY 'KEYSTONE_DBPASS';
mysql> GRANT ALL PRIVILEGES ON keystone.* TO 'keystone'@'%' \
IDENTIFIED BY 'KEYSTONE_DBPASS';
mysql> exit
* MySQL root user password is opsuser
* MySQL keystone user password is opspass
b1, e)
Create the database tables for the Identity Service:
# su -s /bin/sh -c "keystone-manage db_sync" keystone
* Above command didn't work for me
* Worked command
#sudo keystone-manage db_sync
b1, f)
Define an authorization token to use as a shared secret between the Identity Service and other OpenStack services.
Edit /etc/keystone/keystone.conf and change the [DEFAULT] section.
[DEFAULT]
admin_token = tokentoken
b1, g)
Configure the log directory.
Edit the /etc/keystone/keystone.conf file and update the [DEFAULT] section.
[DEFAULT]
log_dir = /var/log/keystone
b1, h)
Restart the Identity Service.
# service keystone restart
b1, i)
Check whether keystone service is running or not.
b1, j)
* Remove your http and https proxy if you are using it in controller node (Optional)
#export http_proxy = ""
#export https_proxy = ""
* Otherwise, you will get ERRO 503: Service Unavailable.
* You will get error, failed: Connection refused, if keystone service is not running and reachable, Check #sudo service keystone status.
C)
Define users, tenants, and roles
-------------------------------------------
http://docs.openstack.org/trunk/install-guide/install/apt/content/keystone-users.html
c1, a)
Create the admin user:
#keystone --os-token tokentoken --os-endpoint http://controller:35357/v2.0 --debug user-create --name=admin --pass=adminpass --email=admin@admin.com
c1, b)
Create the admin role:
#keystone --os-token tokentoken --os-endpoint http://controller:35357/v2.0 --debug role-create --name=admin
c1, c)
Create the admin tenant:
#keystone --os-token tokentoken --os-endpoint http://controller:35357/v2.0 --debug tenant-create --name=admin --description="Admin Tenant"
c1, d)
You must now link the admin user, admin role, and admin tenant together using the user-role-add option:
#keystone --os-token tokentoken --os-endpoint http://controller:35357/v2.0 --debug user-role-add --user=admin --tenant=admin --role=admin
* User, Project and Role relation save in "assignment" table of keystone db.
* "assignment" table has a column named "type", and its type is "enum".
c1, e)
Link the admin user, _member_ role, and admin tenant:
#keystone --os-token tokentoken --os-endpoint http://controller:35357/v2.0 --debug user-role-add --user=admin --role=_member_ --tenant=admin
C2
Create a normal user
---------------------------
Follow these steps to create a normal user and tenant, and link them to the special _member_ role. You will use this account for daily non-administrative interaction with the OpenStack cloud. You can also repeat this procedure to create additional cloud users with different usernames and passwords.
c2, a)
Create the demo user:
#keystone --os-token tokentoken --os-endpoint http://controller:35357/v2.0 --debug user-create --name=demo --pass=demopass --email=demo@demo.com
c2, b)
Create the demo tenant:
#keystone --os-token tokentoken --os-endpoint http://controller:35357/v2.0 --debug tenant-create --name=demo --description="Demo Tenant"
c2, c)
Link the demo user, _member_ role, and demo tenant:
#keystone --os-token tokentoken --os-endpoint http://controller:35357/v2.0 --debug user-role-add --user=demo --role=_member_ --tenant=demo
C3)
Create a service tenant
-------------------------------
OpenStack services also require a username, tenant, and role to access other OpenStack services. In a basic installation, OpenStack services typically share a single tenant named service.
You will create additional usernames and roles under this tenant as you install and configure each service.
* For each service like nova, glance, etc--- , we need to create new username and role under "service" tenant.
C3, a)
Create the service tenant:
#keystone --os-token tokentoken --os-endpoint http://controller:35357/v2.0 --debug tenant-create --name=service --description="Service Tenant"
C4)
Define services and API endpoints
---------------------------------------------
http://docs.openstack.org/icehouse/install-guide/install/apt/content/keystone-services.html
So that the Identity Service can track which OpenStack services are installed and where they are located (endpoint) on the network, you must register each service in your OpenStack installation. To register a service, run these commands:
**keystone service-create: Describes the service.
**keystone endpoint-create: Associates API endpoints with the service.
You must also register the Identity Service itself.
c4, a)
Create a service entry for the Identity Service:
#keystone --os-token tokentoken --os-endpoint http://controller:35357/v2.0 --debug service-create --name=keystone --type=identity --description="OpenStack Identity"
c4, b)
Create a endpoint entry for the Identity Service:
Specify an API endpoint for the Identity Service by using the returned service ID. When you specify an endpoint, you provide URLs for the public API, internal API, and admin API. In this guide, the controller host name is used. Note that the Identity Service uses a different port for the admin API.
#keystone --os-token tokentoken --os-endpoint http://controller:35357/v2.0 --debug endpoint-create \
--service-id=$(keystone service-list | awk '/ identity / {print $2}') \
--publicurl=http://controller:5000/v2.0 \
--internalurl=http://controller:5000/v2.0 \
--adminurl=http://controller:35357/v2.0
C5)
Verify the Identity Service installation
--------------------------------------------------
http://docs.openstack.org/icehouse/install-guide/install/apt/content/keystone-verify.html
c5, a)
You can now use regular user name-based authentication.
Request a authentication token by using the admin username and the password you chose for that user (not giving tenant_name).
#keystone --os-username admin --os-password admin --os-auth-url http://controller:35357/v2.0 --debug token-get
In response, you receive a token paired with your user ID. This verifies that the Identity Service is running on the expected endpoint and that your user account is established with the expected credentials.
c5, b)
Verify that authorization behaves as expected. To do so, request authorization on a tenant.
Request a authentication token by using the admin username, password and tenant_name.
##Get token
#keystone --os-username admin --os-password admin --os-tenant-name admin --os-auth-url http://controller:35357/v2.0 --debug token-get
##Make "user-list" request with new token
#keystone --os-token your_token --os-endpoint http://controller:35357/v2.0 --debug user-list
In response, you receive a token that includes the ID of the tenant that you specified. This verifies that your user account has an explicitly defined role on the specified tenant and the tenant exists as expected.
* Goto /etc/keystone/keystone.conf and set token_format=UUID to change the format of the token from PKI to UUID, So you can easily copy paste token.
c5, c)
You can also set your --os-* variables in your environment to simplify command-line usage. Set up a admin-openrc.sh file with the admin credentials and admin endpoint:
export OS_USERNAME=admin
export OS_PASSWORD=adminpass
export OS_TENANT_NAME=admin
export OS_AUTH_URL=http://controller:35357/v2.0
* Source this file to read in the environment variables:
$ source admin-openrc.sh
* Verify that your admin-openrc.sh file is configured correctly. Run the same command without the --os-* arguments:
$ keystone token-get
No comments:
Post a Comment