
5)
Chapter 5. Configure the Image Service
-----------------------------------------------------
http://docs.openstack.org/icehouse/install-guide/install/apt/content/ch_glance.html
The OpenStack Image Service enables users to discover, register, and retrieve virtual machine images. Also known as the glance project, the Image Service offers a REST API that enables you to query virtual machine image metadata and retrieve an actual image. You can store virtual machine images made available through the Image Service in a variety of locations from simple file systems to object-storage systems like OpenStack Object Storage.
Important
----------
For simplicity, this guide configures the Image Service to use the file back end. This means that images uploaded to the Image Service are stored in a directory on the same system that hosts the service. By default, this directory is /var/lib/glance/images/.
Before you proceed, ensure that the system has sufficient space available in this directory to store virtual machine images and snapshots.
5, A)
Image Service overview
-------------------------------
http://docs.openstack.org/icehouse/install-guide/install/apt/content/image-service-overview.html
The Image Service includes the following components:
a)
glance-api
Accepts Image API calls for image discovery, retrieval, and storage.
b)
glance-registry
Stores, processes, and retrieves metadata about images. Metadata includes items such as size and type.
The registry is a private internal service meant only for use by the Image Service itself. Do not expose it to users.
c)
Database
Stores image metadata. You can choose your database depending on your preference. Most deployments use MySQL or SQlite.
d)
Storage repository for image files.
The Image Service supports a variety of repositories including normal file systems, Object Storage, RADOS block devices, HTTP, and Amazon S3. Some types of repositories support only read-only usage.
* A number of periodic processes run on the Image Service to support caching.
* Replication services ensures consistency and availability through the cluster.
* Other periodic processes include auditors, updaters, and reapers.
Image Service accepts API requests for images or image metadata from end users or Compute components and can store its disk files in the Object Storage Service.
5, B)
Install the Image Service
---------------------------
The OpenStack Image Service acts as a registry for virtual disk images. Users can add new images or take a snapshot of an image from an existing server for immediate storage. Use snapshots for back up and as templates to launch new servers. You can store registered images in Object Storage or in other locations. For example, you can store images in simple file systems or external web servers.
b1, a)
Install the Image Service on the controller node:
# apt-get install glance python-glanceclient


b1, b)
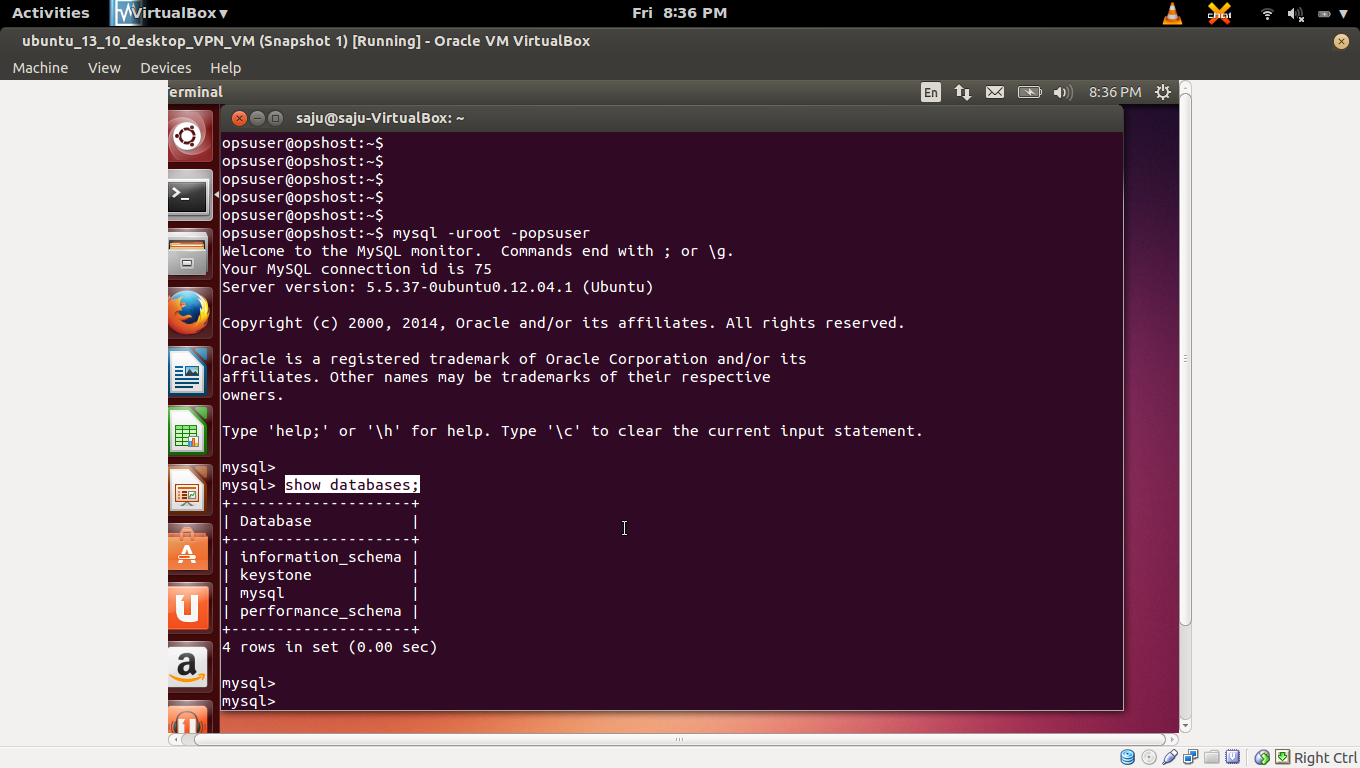
The Image Service stores information about images in a database. The examples in this guide use the MySQL database that is used by other OpenStack services.
Configure the location of the database. The Image Service provides the glance-api and glance-registry services, each with its own configuration file. You must update both configuration files throughout this section. Replace "glancepass" with your Image Service database password.
Edit /etc/glance/glance-api.conf and /etc/glance/glance-registry.conf and edit the [database] section of each file:
[database]
connection = mysql://glance:glancepass@controller/glance
* /etc/glance/glance-api.conf before Change


* /etc/glance/glance-registry.conf before change


* Database Settings Change /etc/glance/glance-api.conf
* Comment "sqlite_db =" and "backend =" and add "connection ="


* Database Settings Change /etc/glance/glance-registry.conf
* Comment "sqlite_db =" and "backend =" and add "connection ="


b1, c)
Configure the Image Service to use the message broker:
Edit the /etc/glance/glance-api.conf file and add the following keys to the [DEFAULT] section:
[DEFAULT]
rpc_backend = glance.openstack.common.rpc.impl_zmq
rpc_zmq_matchmaker = glance..openstack.common.rpc.matchmaker_redis.MatchMakerRedis
[matchmaker_redis]
host = controller
https://github.com/openstack-dev/devstack/blob/master/lib/rpc_backend
http://docs.openstack.org/icehouse/config-reference/content/configuring-rpc.html


b1, d)
By default, the Ubuntu packages create an SQLite database. Delete the glance.sqlite file created in the /var/lib/glance/ directory so that it does not get used by mistake:
#rm /var/lib/glance/glance.sqlite


b1, e)
Use the password you created to log in as root and create a glance database user:


b1, f)
Create the database tables for the Image Service:
# su -s /bin/sh -c "glance-manage db_sync" glance
* Above command didn't work for me
* working command
#sudo glance-manage db_sync


b1, g)
Create a glance user that the Image Service (glance) can use to authenticate with the Identity service (keystone). Choose a password and specify an email address for the glance user. Use the "service" tenant and give the user the "admin" role:
# keystone user-create --name=glance --pass=glancepass --email=glance@example.com
# keystone user-role-add --user=glance --tenant=service --role=admin


b1, h)
Configure the Image Service (glance) to use the Identity Service (keystone) for authentication.
Edit the /etc/glance/glance-api.conf and /etc/glance/glance-registry.conf files.
Replace GLANCE_PASS with the password you chose for the glance user in the Identity service (keystone).
b1, h1)
Edit /etc/glance/glance-api.conf
*
Add or modify the following keys under the [keystone_authtoken] section:
[keystone_authtoken]
auth_host = controller
auth_port = 35357
auth_protocol = http
admin_tenant_name = service
admin_user = glance
admin_password = GLANCE_PASS
*
Modify the following key under the [paste_deploy] section:
[paste_deploy]
...
flavor = keystone


b1, h2)
Edit /etc/glance/glance-registry.conf
*
Add or modify the following keys under the [keystone_authtoken] section:
[keystone_authtoken]
auth_host = controller
auth_port = 35357
auth_protocol = http
admin_tenant_name = service
admin_user = glance
admin_password = GLANCE_PASS
*
Modify the following key under the [paste_deploy] section:
[paste_deploy]
...
flavor = keystone


b1, i)
Register the Image Service (glance) with the Identity service (keystone) so that other OpenStack services (nova, heat, --) can locate it.
Register the service and create the endpoint:
*Register the service
#keystone service-create --name=glance --type=image \
--description="OpenStack Image Service"


*Create the endpoint
#keystone endpoint-create \
--service-id=$(keystone service-list | awk '/ image / {print $2}') \
--publicurl=http://controller:9292 \
--internalurl=http://controller:9292 \
--adminurl=http://controller:9292


b1, j)
Restart the glance services with its new settings:
#service glance-registry restart
#service glance-api restart


5, C)
Verify the Image Service installation
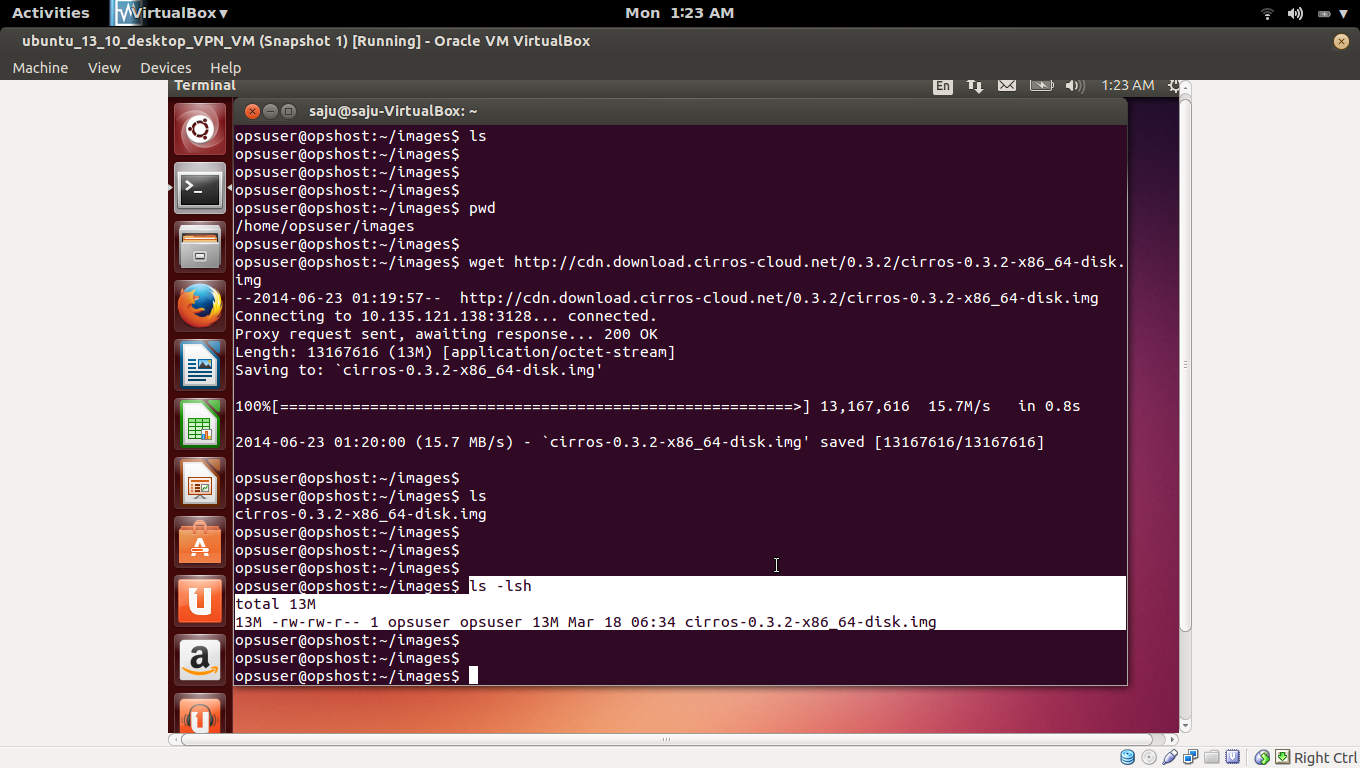
To test the Image Service (glance) installation, download at least one virtual machine image that is known to work with OpenStack. For example, CirrOS is a small test image that is often used for testing OpenStack deployments (CirrOS downloads). This walk through uses the 64-bit CirrOS QCOW2 image.
c1, a)
Download the image into a dedicated directory using wget or curl:
#mkdir /tmp/images
#cd /tmp/images/
#wget http://cdn.download.cirros-cloud.net/0.3.2/cirros-0.3.2-x86_64-disk.img

c1, b)
Upload the image to the Image Service (glance):
#glance image-create --name "cirros-0.3.2-x86_64" --disk-format qcow2 \
--container-format bare --is-public True --progress < cirros-0.3.2-x86_64-disk.img


 c1, c)
Confirm that the image was uploaded and display its attributes:
#glance image-list

Chapter 5. Configure the Image Service
-----------------------------------------------------
http://docs.openstack.org/icehouse/install-guide/install/apt/content/ch_glance.html
The OpenStack Image Service enables users to discover, register, and retrieve virtual machine images. Also known as the glance project, the Image Service offers a REST API that enables you to query virtual machine image metadata and retrieve an actual image. You can store virtual machine images made available through the Image Service in a variety of locations from simple file systems to object-storage systems like OpenStack Object Storage.
Important
----------
For simplicity, this guide configures the Image Service to use the file back end. This means that images uploaded to the Image Service are stored in a directory on the same system that hosts the service. By default, this directory is /var/lib/glance/images/.
Before you proceed, ensure that the system has sufficient space available in this directory to store virtual machine images and snapshots.
5, A)
Image Service overview
-------------------------------
http://docs.openstack.org/icehouse/install-guide/install/apt/content/image-service-overview.html
The Image Service includes the following components:
a)
glance-api
Accepts Image API calls for image discovery, retrieval, and storage.
b)
glance-registry
Stores, processes, and retrieves metadata about images. Metadata includes items such as size and type.
The registry is a private internal service meant only for use by the Image Service itself. Do not expose it to users.
c)
Database
Stores image metadata. You can choose your database depending on your preference. Most deployments use MySQL or SQlite.
d)
Storage repository for image files.
The Image Service supports a variety of repositories including normal file systems, Object Storage, RADOS block devices, HTTP, and Amazon S3. Some types of repositories support only read-only usage.
* A number of periodic processes run on the Image Service to support caching.
* Replication services ensures consistency and availability through the cluster.
* Other periodic processes include auditors, updaters, and reapers.
Image Service accepts API requests for images or image metadata from end users or Compute components and can store its disk files in the Object Storage Service.
5, B)
Install the Image Service
---------------------------
The OpenStack Image Service acts as a registry for virtual disk images. Users can add new images or take a snapshot of an image from an existing server for immediate storage. Use snapshots for back up and as templates to launch new servers. You can store registered images in Object Storage or in other locations. For example, you can store images in simple file systems or external web servers.
b1, a)
Install the Image Service on the controller node:
# apt-get install glance python-glanceclient
b1, b)
The Image Service stores information about images in a database. The examples in this guide use the MySQL database that is used by other OpenStack services.
Configure the location of the database. The Image Service provides the glance-api and glance-registry services, each with its own configuration file. You must update both configuration files throughout this section. Replace "glancepass" with your Image Service database password.
Edit /etc/glance/glance-api.conf and /etc/glance/glance-registry.conf and edit the [database] section of each file:
[database]
connection = mysql://glance:glancepass@controller/glance
* /etc/glance/glance-api.conf before Change
* /etc/glance/glance-registry.conf before change
* Database Settings Change /etc/glance/glance-api.conf
* Comment "sqlite_db =" and "backend =" and add "connection ="
* Database Settings Change /etc/glance/glance-registry.conf
* Comment "sqlite_db =" and "backend =" and add "connection ="
b1, c)
Configure the Image Service to use the message broker:
Edit the /etc/glance/glance-api.conf file and add the following keys to the [DEFAULT] section:
[DEFAULT]
rpc_backend = glance.openstack.common.rpc.impl_zmq
rpc_zmq_matchmaker = glance..openstack.common.rpc.matchmaker_redis.MatchMakerRedis
[matchmaker_redis]
host = controller
https://github.com/openstack-dev/devstack/blob/master/lib/rpc_backend
http://docs.openstack.org/icehouse/config-reference/content/configuring-rpc.html
b1, d)
By default, the Ubuntu packages create an SQLite database. Delete the glance.sqlite file created in the /var/lib/glance/ directory so that it does not get used by mistake:
#rm /var/lib/glance/glance.sqlite
b1, e)
Use the password you created to log in as root and create a glance database user:
b1, f)
Create the database tables for the Image Service:
# su -s /bin/sh -c "glance-manage db_sync" glance
* Above command didn't work for me
* working command
#sudo glance-manage db_sync
b1, g)
Create a glance user that the Image Service (glance) can use to authenticate with the Identity service (keystone). Choose a password and specify an email address for the glance user. Use the "service" tenant and give the user the "admin" role:
# keystone user-create --name=glance --pass=glancepass --email=glance@example.com
# keystone user-role-add --user=glance --tenant=service --role=admin
b1, h)
Configure the Image Service (glance) to use the Identity Service (keystone) for authentication.
Edit the /etc/glance/glance-api.conf and /etc/glance/glance-registry.conf files.
Replace GLANCE_PASS with the password you chose for the glance user in the Identity service (keystone).
b1, h1)
Edit /etc/glance/glance-api.conf
*
Add or modify the following keys under the [keystone_authtoken] section:
[keystone_authtoken]
auth_host = controller
auth_port = 35357
auth_protocol = http
admin_tenant_name = service
admin_user = glance
admin_password = GLANCE_PASS
*
Modify the following key under the [paste_deploy] section:
[paste_deploy]
...
flavor = keystone
b1, h2)
Edit /etc/glance/glance-registry.conf
*
Add or modify the following keys under the [keystone_authtoken] section:
[keystone_authtoken]
auth_host = controller
auth_port = 35357
auth_protocol = http
admin_tenant_name = service
admin_user = glance
admin_password = GLANCE_PASS
*
Modify the following key under the [paste_deploy] section:
[paste_deploy]
...
flavor = keystone
b1, i)
Register the Image Service (glance) with the Identity service (keystone) so that other OpenStack services (nova, heat, --) can locate it.
Register the service and create the endpoint:
*Register the service
#keystone service-create --name=glance --type=image \
--description="OpenStack Image Service"
*Create the endpoint
#keystone endpoint-create \
--service-id=$(keystone service-list | awk '/ image / {print $2}') \
--publicurl=http://controller:9292 \
--internalurl=http://controller:9292 \
--adminurl=http://controller:9292
b1, j)
Restart the glance services with its new settings:
#service glance-registry restart
#service glance-api restart
5, C)
Verify the Image Service installation
To test the Image Service (glance) installation, download at least one virtual machine image that is known to work with OpenStack. For example, CirrOS is a small test image that is often used for testing OpenStack deployments (CirrOS downloads). This walk through uses the 64-bit CirrOS QCOW2 image.
c1, a)
Download the image into a dedicated directory using wget or curl:
#mkdir /tmp/images
#cd /tmp/images/
#wget http://cdn.download.cirros-cloud.net/0.3.2/cirros-0.3.2-x86_64-disk.img
c1, b)
Upload the image to the Image Service (glance):
#glance image-create --name "cirros-0.3.2-x86_64" --disk-format qcow2 \
--container-format bare --is-public True --progress < cirros-0.3.2-x86_64-disk.img
Confirm that the image was uploaded and display its attributes:
#glance image-list
No comments:
Post a Comment